Cha-Ching on a Shoestring™

Living Large on a Limited Budget

  • STORES
    • Coupon Database
    • CVS
    • Rite Aid
    • Walgreens
    • Target
    • Walmart
  • Restaurants
  • Online Deals
    • Amazon Deals
    • Amazon Subscribe & Save Deals
  • Freebies
    • Free Kindle Books
    • Free Stuff by Mail
    • Free Birthday Stuff
    • Free Stuff Online

Too Easy Iced Coffee Recipe

June 3rd, 2016 By Heidi
This post may contain affiliate links, which means I will make a small commission if you click and make a purchase.

Iced Coffee - FB

Memorial Day has passed and thoughts of sipping iced coffee in my backyard while the kids romp around have been lurking in my mind. I decided today was the perfect morning to get back to my favorite (and MOST easy) iced coffee recipe.

Here are the ingredients – are you ready?

  • Coffee
  • Sweetened Condensed Milk
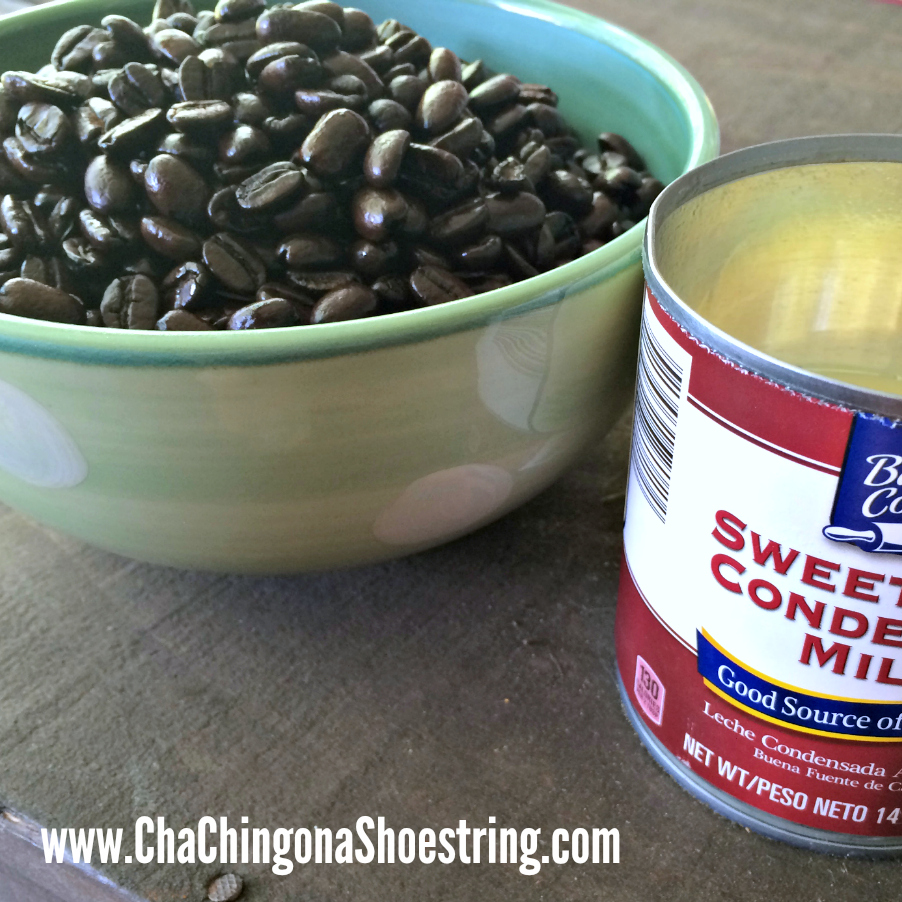
Iced Coffee - ingredients

Really. That’s it.

This recipe takes all the guess work out of the process and makes it a cinch to whip up!

  1. Start by brewing 8 cups of strong, hot coffee
  2. Pour 1/2 of a 14 oz can of sweetened condensed milk into the bottom of a glass container
  3. Add your hot coffee and stir or shake to mix
  4. Allow to cool on the counter until mixture reaches room temperature (stirring or shaking several times as the milk will sink to the bottom)
  5. Store in your refrigerator for up to 1 week
  6. Pour over ice, add a fun straw, sit back and AHHHHH!!! (These glasses would be an adorable way to serve it!)

This recipe is so easy to adjust for individual preferences – just increase or decrease the sweetened condensed milk to coffee ratio depending on your taste!

Now invite some friends over, pour your iced coffee, chat and let the kids ROMP!

Iced Coffee Pin

Filed Under: Merry Little Living, Recipes

Five Easy Chicken Recipes Your Kids Will Beg For

April 4th, 2016 By Heidi
This post may contain affiliate links, which means I will make a small commission if you click and make a purchase.

Chicken Roundup

We eat a lot of chicken in our house. I’m sure that can be said of many families – especially those of us with kids. But I get tired of baked chicken and I never want dinner to get old and boring,  so here are five of my top chicken recipes. These are always on my monthly rotation because the recipes are all SO easy and the kids love every one of them – three cheers for that!!

  1. Holy Yum Chicken: My kids just love saying the name of this recipe – it screams fun and is a guaranteed delicious dinner. With just a few ingredients it’s quite impressive! {Get Recipe HERE}        Holy Yum  
  2. Paprika Chicken: I could seriously eat this chicken every week – it’s that good. If you choose just one of these recipes then make it this one – you won’t regret it. (And don’t be afraid to pile on that paprika – something magical happens when you do) {Get Recipe HERE}                                                                      Paprika Chicken
  3. Mexican Chicken: Here’s another easy weeknight meal that can be whipped up in minutes. Add a side of rice and beans, some fruit and you’ve got dinner covered. {Get Recipe HERE}                                        mexican_chicken
  4. Crockpot Lime Chicken: This dish is so simple and is delicious served with rice or in tortillas. I add a can of diced tomatoes to brighten up the color. {Get Recipe HERE}                                                                 Crockpot-Lime-Chicken3
  5. Cheesy Broccoli Chicken & Rice: Rice dishes in the crockpot can be iffy – they don’t always cook exactly as planned. But this recipe has turned out perfect every time I’ve made it. It has been my go – to dinner on busy nights. {Get Recipe HERE}

Cheesy Chicken Broccoli

And there you have it. Five amazing chicken meals that no one will be bored with and will leave your family begging for more. If your kids are jumping up and down when you tell them what’s for dinner then you know you’re doing something right!

Filed Under: Merry Little Living, Recipes

Delicious Boston Cream Cake Recipe (Amazingly Easy!)

April 1st, 2016 By Kaley
This post may contain affiliate links, which means I will make a small commission if you click and make a purchase.

The Best Boston Cream Pie Recipe

The Best Boston Cream Cake. Ever.

You guys. This cake. Oh my.

I keep trying to find the words to describe just how much I love this newly-discovered recipe. But all that I can muster is two words at a time.

So good.

Amazingly easy.

Num Num Num.

(There! I mustered three words!)

I shared a sneak peek of this cake in my last Merry Little Living Project newsletter and several of you begged for the recipe.

Earning some major brownie points with my boys tonight. (Or should we say Boston Cream points?) #happytuesday #lifewithboys

A photo posted by Kaley Ehret (@kaleyehret) on Feb 2, 2016 at 4:14pm PST

I don’t blame you.

Here’s what I love about this cake. It’s easy enough that I whipped one up on a Tuesday.

Who makes a fancy dessert on a Tuesday night?

This mom.

And then again on a Friday, a Saturday and I believe there was a Monday in the mix too.

Let’s just say that I earned brownie Boston Cream points with my kids, my husband, grandparents, siblings and whoever else happened to stop by. It was a good month.

I want you to have a good month too! In fact, this might set you up for a good year!


The best Boston Cream Cake Recipe

The secret is in the sauce – err, the glaze. I doubled the original recipe because less is not always more, especially when cakes are involved.

Amazingly Easy Boston Cream Cake Recipe

I LOVE how thick the middle layer is. It makes other more thinly layered Boston Cream cakes envious.

Which reminds me, which is it? Boston Cream Cake or Boston Cream Pie? It seems the favored title is Pie, but considering the fact that this is most definitely a Cake, this deeply confuses me.

Delicious Boston Cream Pie Recipe

You’ll likely want to place some kind of pan underneath your cake dish when you pour the glaze on top, as its sweet chocolatey goodness will ooze all over your countertop.

Or you can just use your fingers to scrape it off the counter. And then, of course, you’ll need to clean your fingers. I’ll leave that up to you how to accomplish that task. Ahem.

Print
Boston Cream Cake Recipe (Amazingly Easy and Delicious!)

Boston Cream Cake Recipe (Amazingly Easy and Delicious!)

Ingredients

    Cake:
  • 1 yellow cake mix (and ingredients listed on the package)
  • Filling:
  • 1 cup cold milk
  • 1 (3.4 ounce) pkg. instant vanilla pudding
  • 1½ cups Cool Whip
  • Chocolate Glaze:
  • 2 (1 ounce) squares unsweetened baking chocolate
  • 2 tablespoons butter
  • 1 1/2 cup powdered sugar
  • 4 tablespoons milk

Instructions

  1. Preheat oven and prepare cake mix according to package directions.
  2. Spray two 9-inch round pans with cooking spray then lightly flour.
  3. Bake cake according to package directions; until golden brown and center passes the toothpick test. Once done, let cakes cool and invert on a wire rack to cool further.
  4. For the Filling:
  5. Beat 1 cup of milk and pudding mix with a whisk or mixer for 2 minutes. Gently fold in whipped cream. Let stand 5 minutes.
  6. Place one cake on serving plate, spread pudding mixture on top, then top off with second cake.
  7. For the glaze:
  8. Microwave chocolate and butter on high for one minute in a small microwave safe bowl. Stir until chocolate is melted. Add powdered sugar and 4 tablespoons milk; mix well until smooth. Spread over the top of the cake immediately letting drip down the sides. Refrigerate at least one hour before serving.

Notes

Adapted from The Girl Who Ate Everything

3.1
https://chachingonashoestring.com/2016/04/01/the-best-boston-cream-pie-recipe/


The best Boston Cream Pie Recipe

Filed Under: Merry Little Living, Recipes Tagged With: noads

The Dollar Store Diva: Celebratory Easter Printables

March 21st, 2016 By Kaley
This post may contain affiliate links, which means I will make a small commission if you click and make a purchase.

Easter Wall Art Printable

I love these Easter printables from our very own Dollar Store Diva! Such a simple and lovely way to commemorate the Easter holiday. I’m going to print mine out now!

***

As my children were growing, we had a traditional saying as Easter approached. Their dad would exclaim, “He is risen!” With equal zeal, we would all respond, “He is risen indeed!”

This year I created two printables– He is Risen Indeed –to keep these powerful Easter announcements in brilliant view in our home.

I trimmed the two printables, adhered them to sheets of colored paper, and slipped them into  8×10″ frames.

Easter Printables He is Risen

And there you have it–Easter printables to celebrate this blessed holiday.

Click here to print yours.

***

For those of you who haven’t met her, the Dollar Store Diva happens to be my Mom who has a special power.  She can transform Dollar Store and other inexpensive finds into super fun gifts that would brighten anyone’s day!

Filed Under: Merry Little Living, Simple Living Tagged With: Dollar Store Diva

Incredibly Easy and Delicious Triple Layer Peanut Butter and Chocolate Cookie Bars

March 16th, 2016 By Elizabeth
This post may contain affiliate links, which means I will make a small commission if you click and make a purchase.


cookiebarsfacebook

Easy Triple Layer Peanut Butter and Chocolate Cookie Bars

I’m happy to be sharing another post from my friend Elizabeth. She is a truly gifted hostess and is sharing one of her secrets to keeping things simple when it comes to dessert. I can’t wait to give these a try!

When Kaley asked if I had any simple dessert recipes to share, I immediately thought of these deliciously easy Triple Layer Cookie Bars that I have made over and over through the years. My friend passed on the recipe after she brought them to a camping trip years ago and we all loved them!  They have come in handy so many times when I need a quick dessert or snack.

I love that, with only six ingredients, these cookie bars are so easy that I can even ask one of my older kids to make them for me.

My little kids love to help with this recipe too. The first layer is crushed graham crackers. I put the graham crackers in a ziploc bag and then the kids love to use a rolling pin to smash them into crumbs.

I always buy the ingredients at ALDI, which also makes this a dessert on the cheap.  At only $0.15 per serving, I can afford to whip these up any time!

This recipe makes about 3 dozen bars. Enjoy! 

Print
Easy Triple Layer Cookie Bars

Ingredients

  • 1 stick of butter ($0.63)
  • 1 sleeve of Graham Crackers ($0.43), smashed into crumbs (see above for method I use)
  • 7 oz flaked coconut ($0.65)
  • 1 can of sweetened condensed milk ($1.39)
  • 11 oz bag of milk chocolate or semi sweet chocolate chips ($1.79)
  • 1/2 cup of peanut butter ($0.37)
  • (Total Cost $5.26 or $0.15 per serving)

Instructions

  1. Preheat oven to 350. Place stick of butter in a 9 x 13 pan and place in the oven to melt. When the butter is melted, stir in the crushed graham crackers. Pat down with a spoon or your hands to make an even layer.
  2. Sprinkle coconut evenly on top of graham crackers. Drizzle sweetened condensed milk over the coconut in an even layer. Bake in oven for about 20 minutes or until lightly browned.
  3. Meanwhile, stir chocolate chips and peanut butter in a saucepan to melt.
  4. Remove bars from oven and pour melted chocolate mixture evenly over the top while the bars are still warm.
  5. Allow to cool in the refrigerator. Cut into bars and serve.
3.1
https://chachingonashoestring.com/2016/03/16/incredibly-easy-and-delicious-triple-layer-peanut-butter-and-chocolate-cookie-bars/


cookiebarspinterest


Filed Under: Merry Little Living, Recipes Tagged With: noads

How Planning a Month of Meals Makes My Life Easier + FREE Printable

March 7th, 2016 By Heidi
This post may contain affiliate links, which means I will make a small commission if you click and make a purchase.

meal planning

I’m glad to welcome back my friend Heidi to share her favorite tips on how and why she meal plans one month at a time. Plus I love the free meal planning printable that she created for us!

How Planning a Month of Meals Makes My Life Easier

A strange irony of my life is that meal planning has become one of my least favorite tasks, yet I love to cook. Anyone else feel that way? I don’t fully understand why it has become so hard to force myself to take the hour (really that’s generally how little time it takes) to follow through with it because when I do, our household runs so much more smoothly.  When I don’t, the idea of cooking dinner for my family becomes a downright drag.

Why I Plan A Whole Month:

1. I only have to spend time planning every 30 days or so.

2. I can reuse the same recipes each month. If my family is served the same meal only once a month I certainly won’t hear “we’re having _____ again?”

3. I like to shop at Costco once a month to get the bulk of my groceries and go to ALDI to pick up smaller items or produce on a weekly basis.

4. I always have all the ingredients on hand to get through a month or more of meals

10 Steps To Get It Done: 

1. At the end of a month I pull out my printable meal planner and start filling in meals for the upcoming weeks. This is the first week of March so I spent an hour last week to plan for this month.

2. I consult my calendar to see which days we do not need dinner and fill in those spaces (date nights, dinner at family or friend’s houses, school or church activities, etc)

3. Since I’ve declared Saturdays to be “Soup Saturdays” in our house, I go ahead and fill in every Saturday with my go-to soups.

4. I like to make a crockpot meal once a week and I choose to do that on days I know are busy. Right now I work on Monday and Thursday, plus my daughter has ballet after school on Thursday – so that’s my crockpot night. I go ahead and fill in each Thursday with a crockpot meal.

5. I want Fridays to be easy. Pizza & a simple salad helps to keep things relaxing after a long, busy school or work week – I go ahead and fill that in on Fridays.

6. I’m trying to experiment with more meatless meals.  Eating vegetarian once a week saves us money and keeps things healthy – I go ahead and fill in a meatless meal once a week.

7. For the remainder of the days, I look at the meals that my family likes to eat and try to match up ease or difficulty of the recipe with a busy or slow day (this may not always work because life can change in a flash but the idea is there).

8. With all this cooking there is always enough food for a leftover day – for us it’s Sundays. Kids are hungry after church and if I can quickly heat up some leftovers everyone is well fed and ready to relax while my youngest naps.

9. After I fill in my planner with our menu, I go through my recipes and make a master list of things I need at Costco, Aldi or another grocery store if I need to pick up some specialty items.

10. With this method I always have what I need to make a variety of meals. Often I have enough food to spill into the next month a little bit too.  Life happens, plans change so sometimes we don’t always stick to this exactly but the bottom line is that I don’t have to stare into the fridge or the pantry and say “there is nothing to eat…”!

I choose to only plan for dinners. I have a big list of staple items that I purchase at Costco or ALDI and these items are great for daily breakfast and lunch which tend to be more basic in our home. If I decide I’m going to do something special for either of those things I can just add that to the notes section at the bottom of the planner.

The joy of this method is that I only have to think hard (about dinner) once a month. So while this does take some time up front, it ultimately saves money and more time later on!

Free Monthly Meal Planning Printable

Want to try monthly meal planning? Click here to download your free meal planning printable!

You Might Also Like:

Meal planning made simple
The Money Saving Benefits of 5 Minute Meal Planning
The #1 Tip that Changed my Laundry System and Gave me Back My Life

Filed Under: Meal Planning, Merry Little Living, Organization, Recipes

My Monthly Missions Update for February {Office Hours, Brene Brown and More}

February 29th, 2016 By Kaley
This post may contain affiliate links, which means I will make a small commission if you click and make a purchase.

My Monthly Missions

Happy Leap Day, friends!

While my son is happy that he gets to celebrate his actual half birthday for the first time in four years, I’ll admit that I’d much prefer an extra day in June or July than February. Can I get an amen? And this is how I feel about Leap Day being on a Monday. 🙂

Enough of that silliness. Let’s talk about Monthly Missions!

This past month, I asked myself four questions:

  • What is one way I can simplify life this month?
  • What is one way I can practice a healthy habit this month?
  • What is one way I can organize life this month?
  • What is one way I can bring joy to life this month?

Here’s what I came up with:

How I simplified life: 

How I Doubled my Productivity with Office Hours at Home

I set up Office Hours at home and doubled my productivity. I am LOVING my new system!

How I practiced a healthy habit:  


Gifts of Imperfection

I aimed high on my goal for a healthy habit this month. I hoped to finish the four books I had started. I finished two of them, so I made it halfway there! (This is the part where I confess that I started two more books. Oops. I just.can’t.help.myself.)

I am enjoying the Brene Brown books I received for Christmas. I finished The Gifts of Imperfection this month and have been thinking a great deal about how my image of “who I should be” has damaged my ability to simply be me. I’m working hard on changing this mindset and her book helped solidify my desire to do so.


How I organized life: 

I decided it was time to hop back on the “Making-My-Bed-Everyday” bandwagon. Every time I do this, I wonder why I ever stop? It’s a habit that only takes a minute, but really can change the whole feel of a room and start the day off on the right note.

How I brought joy to life: 


Because the world needs more pictures of tattooed three year olds writing xo on all their Valentines.

A photo posted by Kaley Ehret (@kaleyehret) on Feb 11, 2016 at 10:40am PST

My mission for joy this month was to have some Valentine’s fun. It just so happened that we had a whole bunch of family here on the weekend of Valentine’s Day, so the boys and I had a happy time putting together Valentine’s cards and goodies for them. I loved watching my 3 year old work so carefully to put XO on all his Valentines (and the heart tattoo was just a bonus!)

In full disclosure, my husband and I watched Parks & Rec re-runs and ate Bugles to celebrate Valentine’s Day together. (And I loved every minute of it.)

So now I want to know:

What are YOUR Monthly Missions for March?

I’ve been really happy with this new strategy for planning simplicity and joy into my life and I’d love for you to join me.

If you sign up for the Merry Little Living Project email newsletter, you’ll receive a free printable Monthly Missions planner in your inbox right away.

Then sometime in the next few days, grab your printable,  a cup of coffee and a pencil and map out your missions for the month.

And then – if you’d like a little bit of accountability – share your missions in the comment below or send me an email. Let’s help each other celebrate Simple, Joyful Life!

I’ll be sharing what my missions are this month in my Merry Little Living Project newsletter so be sure to click here to sign up if you haven’t yet! 

Monthly Missions

Filed Under: Merry Little Living, Simple Living Tagged With: noads

How I Doubled My Productivity with Office Hours at Home

February 27th, 2016 By Kaley
This post may contain affiliate links, which means I will make a small commission if you click and make a purchase.

How I Doubled My Productivity with Office Hours at Home

Most days, I love being a blogger. I often call it my dream job.

But working from home has its share of complications, particularly when it comes to balancing work/family life.

It’s very easy to allow work time to creep into family time or vice versa when your family space is the same as your workspace so you have to be careful. I was reading an article that featured some working from home statistics 2020 and I found it so interesting. I often take for granted the fact that I can work from home and be there for my kids if they need me. I mean, it has some fantastic benefits, right?!

Over the last year, I allowed myself to set up my workspace right smack dab in the middle of our living room on the couch. While it’s lovely that this is an option for me, it’s also a really terrible productivity plan. I also use that same space for reading, hanging out with my kids, people-watching through our picture window, even occasionally putting my feet up and taking a nap. So over the course of the year, my work/family/personal time all sort of seemed to flow together without any real structure. At the end of the day, I often couldn’t tell you exactly what I had accomplished that day. I mentioned this to a friend of mine, who recommended I did some research into Tools to Boost Productivity, as this could be the first step to finding the balance between work and life, especially when working at home.

The crazy thing about this situation is that I have a lovely closet office space that my cousin, my husband and I DIY’ed together a few years ago. DIY’ing is in our blood – we’ve got a toolbox brimming with things that are just begging to be used on our next project. We’ve got nuts, bolts, washers, fastening guns; collated screws are ideal for some of the jobs we’ve got planned so it’s good we’ve got plenty of those.

How I Doubled my Productivity with Office Hours at Home

My closet-turned-office space (also my new ukulele – a birthday gift that I fully intend to learn to play this year – not during my office hours though. Of course.).

This fun little nook stayed mostly vacant over the course of the past year. Poor thing.

Last month, one of my monthly missions was to try to set up a simpler schedule for my blogging hours. I knew that my productivity could increase if I had set hours that I worked each day rather than the haphazard daily schedule I’d been keeping.

In order to accomplish this task, I knew something had to change in my work environment. So my first step was to reclaim my closet office in order to have a location where I “report to work” every day. Yes, I may show up in my yoga pants, but let’s just keep that between you and me, shall we?

Then, my next step was to set up my office hours.

Office Hours

I am grateful to say that my 3 year old son still takes a nap each day (knock on all.the.wood.). So it made sense that I should structure my work hours around his nap. He also goes to pre-school three mornings a week, but I decided to keep that time open for running errands, visiting with friends, playing my ukulele or people-watching out my picture window. You just never know what important task a day might bring.

I gave myself pretty limited hours because I wanted to force myself to really focus during those times, I also decided to write down a guideline for each day as to what I hoped to accomplish. I am a bit of a free spirit, so giving myself too much structure usually backfires. However, I’m also a dreamer, so if left to myself, I would spend 9/10 of my week dreaming about the next Big Thing I hoped to accomplish and then the last 1/10 trying to accomplish it. It’s a struggle being my brain sometimes.

So I hung a chalkboard up in my office and I scratched out my office hours for the week and what I intend to do with them.

You guys. I am in LOVE with my new system. After almost 7 years of being a blogger, I feel like I have *finally* found my groove. Is it a fool-proof system? No. Do my hours occasionally still run into each other? Yep.

But my productivity is better than it’s been in years and at the end of a week, I feel a much greater sense of accomplishment than I can remember in a long time. This is not only due to the time I’ve set aside to work, but the time that I’ve set aside for NOT working. I love having an office space too. It’s amazing and as I mentioned before, it’s making me so productive! The only thing I don’t like about my office is how messy it can get. It’s so annoying! One of my friends who owns a business recommended that I check out FilecenterDMS.com to manage my documents so that I don’t have huge piles of paper all over the office! It’s something I’m definitely considering at the minute.

I also feel strongly that by actually physically writing down my office hours and posting them on my wall (and on the internet) for all to see, I’ve created an accountability that’s been missing from my work-by-myself-no-one-knows-but-me office environment. I’ve tried many time though the years to have set times each day that I would work, but never actually posted those hours anywhere. It’s totally out there for the world to see, so I have to stick with it now!

It’s likely that my schedule will need to be tweaked from time to time, but for now I love how my new system works for me!

How about you? Have you ever tried to establish office hours in your home? How does that work for you?

Filed Under: Merry Little Living, Simple Living Tagged With: noads

  • 1
  • 2
  • 3
  • …
  • 5
  • Next Page »

Welcome

About
Contact

My  name is Kaley. Wife, Mama, and Dreamer, I have a passion for saving money, living simply, and helping others find creative ways to live large on a limited budget.

My Favorite Things

Copyright © 2025 Kaley Ehret · Site Design by Sharon Hujik · Log in
Disclaimer | Disclosure Policy | Privacy Statement