Cha-Ching on a Shoestring™

Living Large on a Limited Budget

  • STORES
    • Coupon Database
    • CVS
    • Rite Aid
    • Walgreens
    • Target
    • Walmart
  • Restaurants
  • Online Deals
    • Amazon Deals
    • Amazon Subscribe & Save Deals
  • Freebies
    • Free Kindle Books
    • Free Stuff by Mail
    • Free Birthday Stuff
    • Free Stuff Online

Delicious Boston Cream Cake Recipe (Amazingly Easy!)

April 1st, 2016 By Kaley
This post may contain affiliate links, which means I will make a small commission if you click and make a purchase.

The Best Boston Cream Pie Recipe

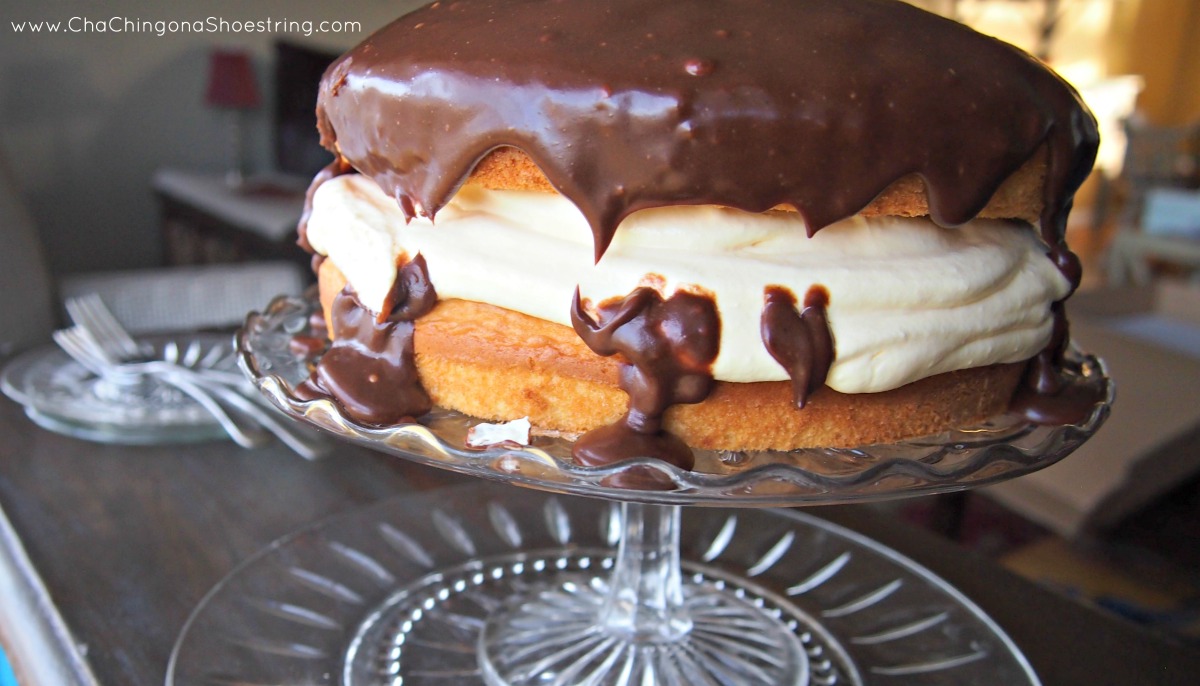
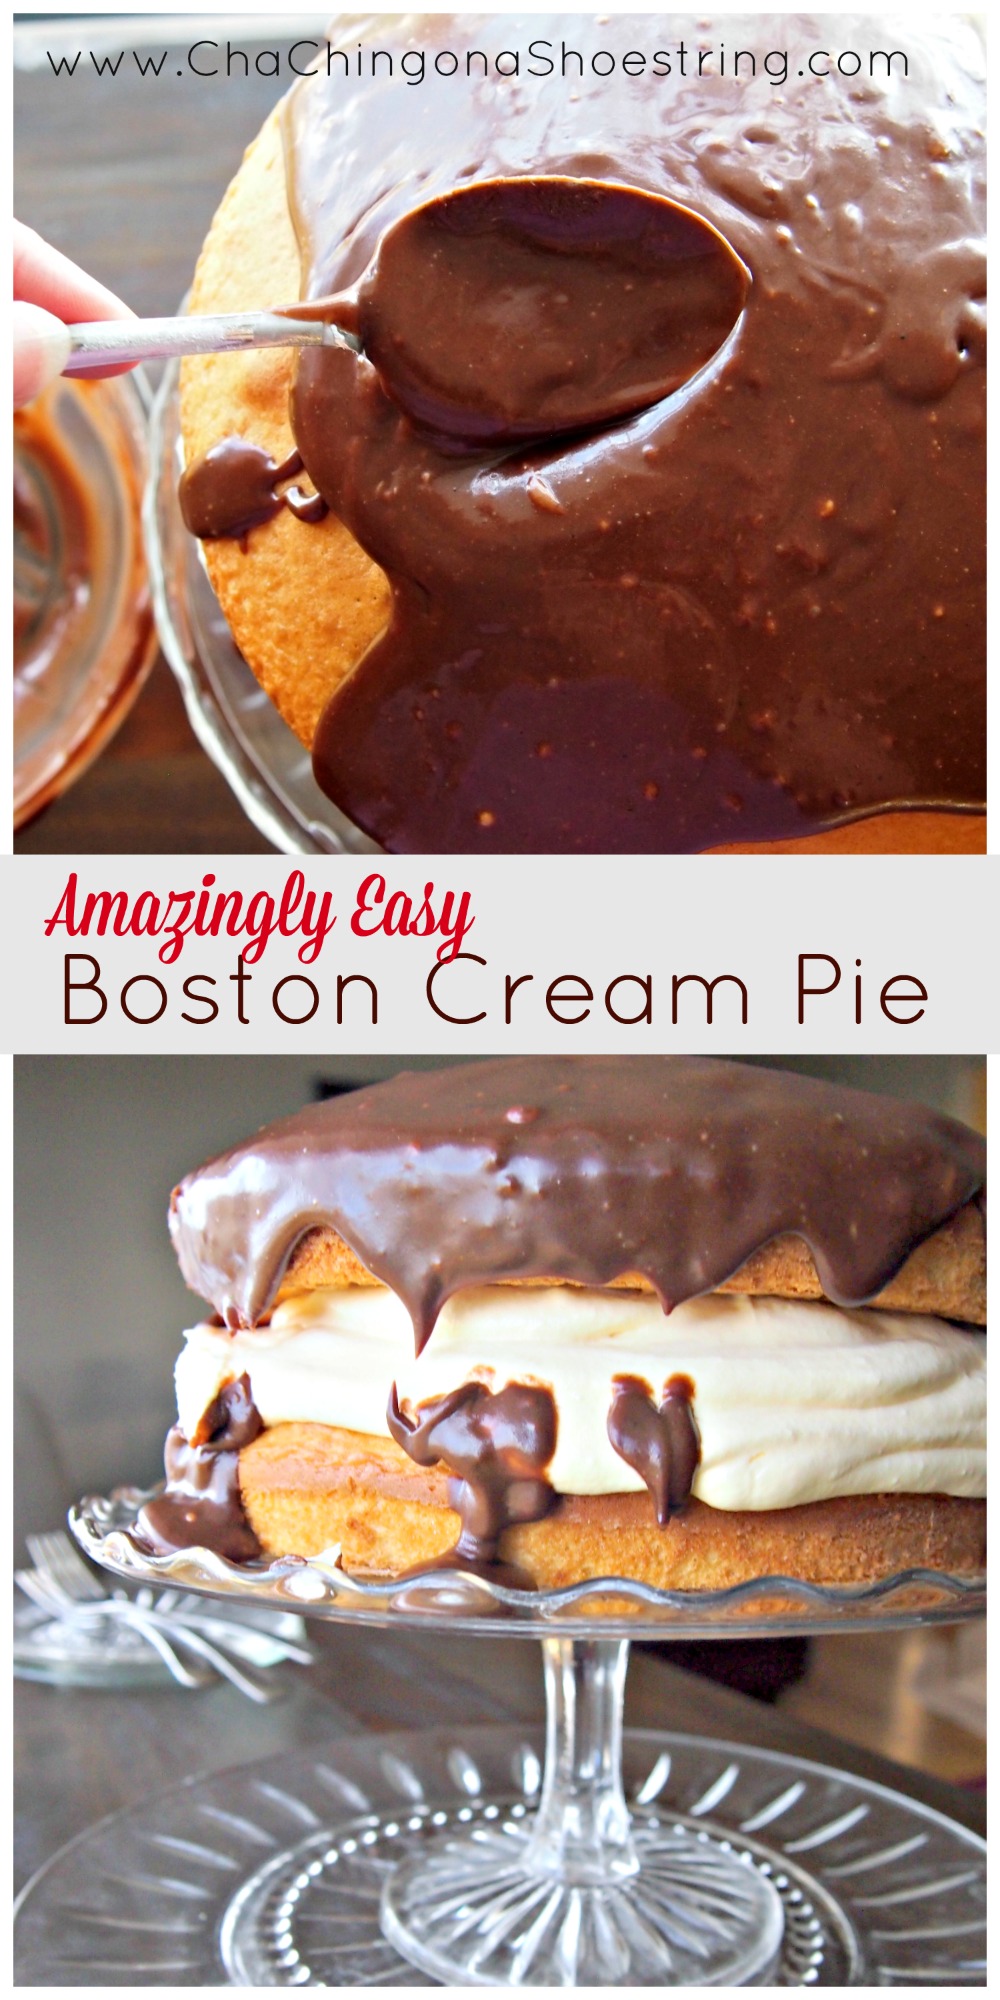
The Best Boston Cream Cake. Ever.

You guys. This cake. Oh my.

I keep trying to find the words to describe just how much I love this newly-discovered recipe. But all that I can muster is two words at a time.

So good.

Amazingly easy.

Num Num Num.

(There! I mustered three words!)

I shared a sneak peek of this cake in my last Merry Little Living Project newsletter and several of you begged for the recipe.

Earning some major brownie points with my boys tonight. (Or should we say Boston Cream points?) #happytuesday #lifewithboys

A photo posted by Kaley Ehret (@kaleyehret) on Feb 2, 2016 at 4:14pm PST

I don’t blame you.

Here’s what I love about this cake. It’s easy enough that I whipped one up on a Tuesday.

Who makes a fancy dessert on a Tuesday night?

This mom.

And then again on a Friday, a Saturday and I believe there was a Monday in the mix too.

Let’s just say that I earned brownie Boston Cream points with my kids, my husband, grandparents, siblings and whoever else happened to stop by. It was a good month.

I want you to have a good month too! In fact, this might set you up for a good year!


The best Boston Cream Cake Recipe

The secret is in the sauce – err, the glaze. I doubled the original recipe because less is not always more, especially when cakes are involved.

Amazingly Easy Boston Cream Cake Recipe

I LOVE how thick the middle layer is. It makes other more thinly layered Boston Cream cakes envious.

Which reminds me, which is it? Boston Cream Cake or Boston Cream Pie? It seems the favored title is Pie, but considering the fact that this is most definitely a Cake, this deeply confuses me.

Delicious Boston Cream Pie Recipe

You’ll likely want to place some kind of pan underneath your cake dish when you pour the glaze on top, as its sweet chocolatey goodness will ooze all over your countertop.

Or you can just use your fingers to scrape it off the counter. And then, of course, you’ll need to clean your fingers. I’ll leave that up to you how to accomplish that task. Ahem.

Print
Boston Cream Cake Recipe (Amazingly Easy and Delicious!)

Boston Cream Cake Recipe (Amazingly Easy and Delicious!)

Ingredients

    Cake:
  • 1 yellow cake mix (and ingredients listed on the package)
  • Filling:
  • 1 cup cold milk
  • 1 (3.4 ounce) pkg. instant vanilla pudding
  • 1½ cups Cool Whip
  • Chocolate Glaze:
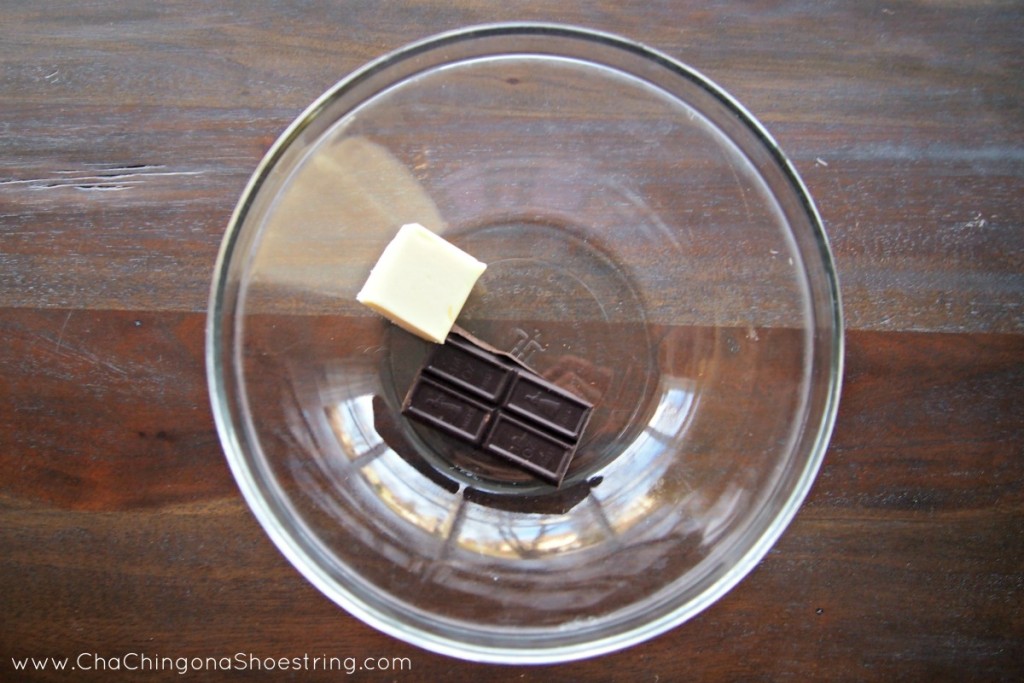
  • 2 (1 ounce) squares unsweetened baking chocolate
  • 2 tablespoons butter
  • 1 1/2 cup powdered sugar
  • 4 tablespoons milk

Instructions

  1. Preheat oven and prepare cake mix according to package directions.
  2. Spray two 9-inch round pans with cooking spray then lightly flour.
  3. Bake cake according to package directions; until golden brown and center passes the toothpick test. Once done, let cakes cool and invert on a wire rack to cool further.
  4. For the Filling:
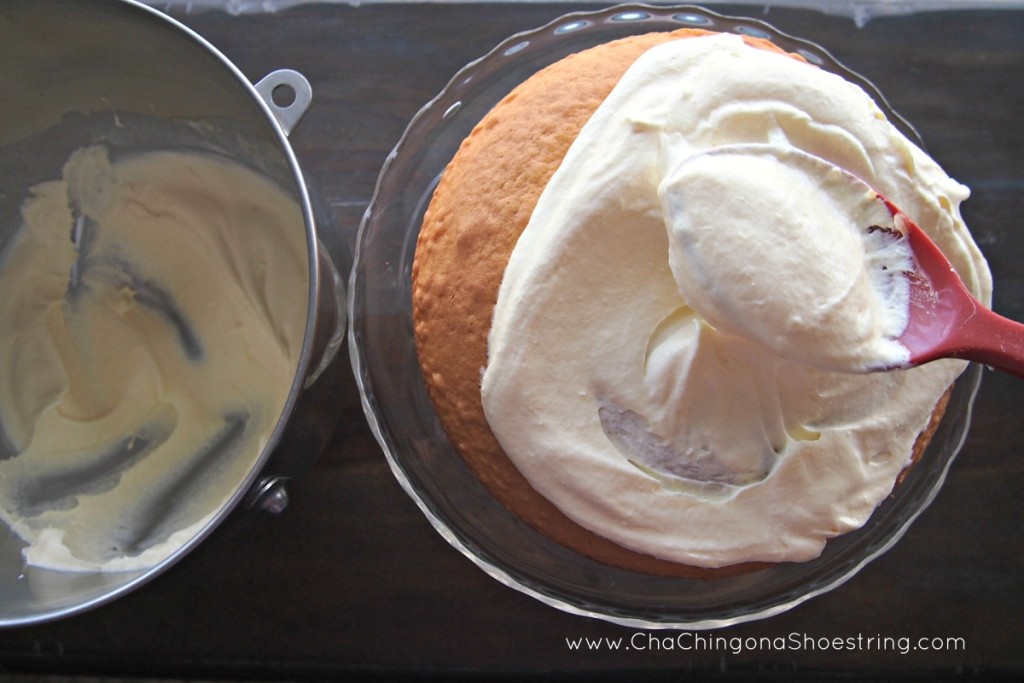
  5. Beat 1 cup of milk and pudding mix with a whisk or mixer for 2 minutes. Gently fold in whipped cream. Let stand 5 minutes.
  6. Place one cake on serving plate, spread pudding mixture on top, then top off with second cake.
  7. For the glaze:
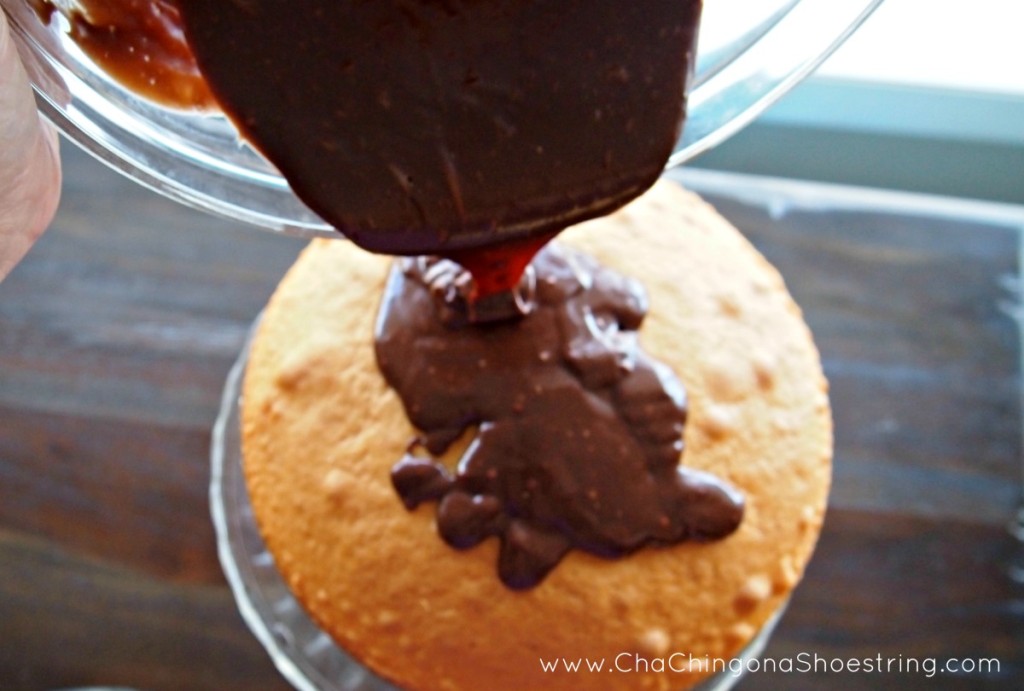
  8. Microwave chocolate and butter on high for one minute in a small microwave safe bowl. Stir until chocolate is melted. Add powdered sugar and 4 tablespoons milk; mix well until smooth. Spread over the top of the cake immediately letting drip down the sides. Refrigerate at least one hour before serving.

Notes

Adapted from The Girl Who Ate Everything

3.1
https://chachingonashoestring.com/2016/04/01/the-best-boston-cream-pie-recipe/


The best Boston Cream Pie Recipe

Filed Under: Merry Little Living, Recipes Tagged With: noads

How I Made A Simple Spring Wreath in just 10 Minutes

March 29th, 2016 By Heidi
This post may contain affiliate links, which means I will make a small commission if you click and make a purchase.

Spring wreath

How to Make a Simple Spring Wreath in 10 Minutes

I have desperately needed a new Spring wreath. It’s March and until last week I still had a Winter wreath hanging on my front door – oops!

I love checking out all the beautiful wreaths online and in stores but do NOT want to shell out the $60+ for something to hang on my door. My mother-in-law had given me one of the many grapevine wreaths she had lying around her house, so that’s where I started. I made a trek to the craft store and set to work thinking of the most simple way to dress it up within a small budget and this is what I came up with:

IMG_6504

The BEST part…I made this $15 wreath in 10 minutes!

Here are the supplies I picked up along with additional items you’ll need to complete the project:

  • Greenery – $8.99
  • Flowers  – $2.39
  • Wired Ribbon – $2.39 (40% off coupon)
  • Grapevine Wreath (already had)
  • Thin Wire (already had)
  • Wire Cutters (already had)

There is one simple, little trick that I used on this project that I have never used before and I’m convinced it’s what made this wreath so quick to complete.  It was the use of wire to attach the greenery! I know that’s not rocket science but I had never thought of it before – I always used my trusty hot glue gun, but that caused me some troubles that I could never overcome.

My front door faces west, on a brick house with zero shade. The front of my house gets SO hot in the afternoon during spring and summer that I’ve actually had wreaths completely fall apart, especially the ones that I’ve made using hot glue. I’m hoping this trick will save the life of my new wreath.

Here are the steps:

  1. Using your wire cutters, cut large sections of greenery and lay them on your grapevine wreath in a natural looking pattern.
  2. Wrap your wire around your greenery and twist together tightly to secure the initial loop.
  3. Continue to wrap your wire around the greenery just tight enough to securely hold the shape of the greenery around the grapevine frame.
  4. When you have wrapped your wire completely around, hold your wreath up as if it was hanging on your door and tighten or loosen the wire as necessary in order to create a natural looking shape.
  5. When you are happy with your design, twist the ends together and snip with your wire cutters
  6. If you choose to add flowers, go ahead and cut the stems so that you have several sections of flowers
  7. Once you’ve decided where you want the flowers to go, you can tuck the stems into the wreath until they are secure. You may want to wrap additional wire around the stems to secure it even further.
  8. Take your wired ribbon and attach a bow!

That’s it!

You’re done and now YOU have a beautiful wreath for your door or home.

simple wreath

Filed Under: Great Deals, Simple Living Tagged With: noads

Incredibly Easy and Delicious Triple Layer Peanut Butter and Chocolate Cookie Bars

March 16th, 2016 By Elizabeth
This post may contain affiliate links, which means I will make a small commission if you click and make a purchase.


cookiebarsfacebook

Easy Triple Layer Peanut Butter and Chocolate Cookie Bars

I’m happy to be sharing another post from my friend Elizabeth. She is a truly gifted hostess and is sharing one of her secrets to keeping things simple when it comes to dessert. I can’t wait to give these a try!

When Kaley asked if I had any simple dessert recipes to share, I immediately thought of these deliciously easy Triple Layer Cookie Bars that I have made over and over through the years. My friend passed on the recipe after she brought them to a camping trip years ago and we all loved them!  They have come in handy so many times when I need a quick dessert or snack.

I love that, with only six ingredients, these cookie bars are so easy that I can even ask one of my older kids to make them for me.

My little kids love to help with this recipe too. The first layer is crushed graham crackers. I put the graham crackers in a ziploc bag and then the kids love to use a rolling pin to smash them into crumbs.

I always buy the ingredients at ALDI, which also makes this a dessert on the cheap.  At only $0.15 per serving, I can afford to whip these up any time!

This recipe makes about 3 dozen bars. Enjoy! 

Print
Easy Triple Layer Cookie Bars

Ingredients

  • 1 stick of butter ($0.63)
  • 1 sleeve of Graham Crackers ($0.43), smashed into crumbs (see above for method I use)
  • 7 oz flaked coconut ($0.65)
  • 1 can of sweetened condensed milk ($1.39)
  • 11 oz bag of milk chocolate or semi sweet chocolate chips ($1.79)
  • 1/2 cup of peanut butter ($0.37)
  • (Total Cost $5.26 or $0.15 per serving)

Instructions

  1. Preheat oven to 350. Place stick of butter in a 9 x 13 pan and place in the oven to melt. When the butter is melted, stir in the crushed graham crackers. Pat down with a spoon or your hands to make an even layer.
  2. Sprinkle coconut evenly on top of graham crackers. Drizzle sweetened condensed milk over the coconut in an even layer. Bake in oven for about 20 minutes or until lightly browned.
  3. Meanwhile, stir chocolate chips and peanut butter in a saucepan to melt.
  4. Remove bars from oven and pour melted chocolate mixture evenly over the top while the bars are still warm.
  5. Allow to cool in the refrigerator. Cut into bars and serve.
3.1
https://chachingonashoestring.com/2016/03/16/incredibly-easy-and-delicious-triple-layer-peanut-butter-and-chocolate-cookie-bars/


cookiebarspinterest


Filed Under: Merry Little Living, Recipes Tagged With: noads

20 (Non-Candy) Easter Basket Gift Ideas Under $5

March 2nd, 2016 By Kaley
This post may contain affiliate links, which means I will make a small commission if you click and make a purchase.

Easter-Basket-Gift-Ideas-Under-$5

Easter Basket Gift Ideas Under $5 on Amazon

I’ve updated my 20 (Non-Candy) Easter Basket Gift Ideas Under $5 post. Head over here to check it out. You’ll find brands like Melissa & Doug, Disney, Crayola, LEGO and more – all from Amazon and no candy involved!

Filed Under: Amazon deals, Online Deals Tagged With: noads, novideo

My Monthly Missions Update for February {Office Hours, Brene Brown and More}

February 29th, 2016 By Kaley
This post may contain affiliate links, which means I will make a small commission if you click and make a purchase.

My Monthly Missions

Happy Leap Day, friends!

While my son is happy that he gets to celebrate his actual half birthday for the first time in four years, I’ll admit that I’d much prefer an extra day in June or July than February. Can I get an amen? And this is how I feel about Leap Day being on a Monday. 🙂

Enough of that silliness. Let’s talk about Monthly Missions!

This past month, I asked myself four questions:

  • What is one way I can simplify life this month?
  • What is one way I can practice a healthy habit this month?
  • What is one way I can organize life this month?
  • What is one way I can bring joy to life this month?

Here’s what I came up with:

How I simplified life: 

How I Doubled my Productivity with Office Hours at Home

I set up Office Hours at home and doubled my productivity. I am LOVING my new system!

How I practiced a healthy habit:  


Gifts of Imperfection

I aimed high on my goal for a healthy habit this month. I hoped to finish the four books I had started. I finished two of them, so I made it halfway there! (This is the part where I confess that I started two more books. Oops. I just.can’t.help.myself.)

I am enjoying the Brene Brown books I received for Christmas. I finished The Gifts of Imperfection this month and have been thinking a great deal about how my image of “who I should be” has damaged my ability to simply be me. I’m working hard on changing this mindset and her book helped solidify my desire to do so.


How I organized life: 

I decided it was time to hop back on the “Making-My-Bed-Everyday” bandwagon. Every time I do this, I wonder why I ever stop? It’s a habit that only takes a minute, but really can change the whole feel of a room and start the day off on the right note.

How I brought joy to life: 


Because the world needs more pictures of tattooed three year olds writing xo on all their Valentines.

A photo posted by Kaley Ehret (@kaleyehret) on Feb 11, 2016 at 10:40am PST

My mission for joy this month was to have some Valentine’s fun. It just so happened that we had a whole bunch of family here on the weekend of Valentine’s Day, so the boys and I had a happy time putting together Valentine’s cards and goodies for them. I loved watching my 3 year old work so carefully to put XO on all his Valentines (and the heart tattoo was just a bonus!)

In full disclosure, my husband and I watched Parks & Rec re-runs and ate Bugles to celebrate Valentine’s Day together. (And I loved every minute of it.)

So now I want to know:

What are YOUR Monthly Missions for March?

I’ve been really happy with this new strategy for planning simplicity and joy into my life and I’d love for you to join me.

If you sign up for the Merry Little Living Project email newsletter, you’ll receive a free printable Monthly Missions planner in your inbox right away.

Then sometime in the next few days, grab your printable,  a cup of coffee and a pencil and map out your missions for the month.

And then – if you’d like a little bit of accountability – share your missions in the comment below or send me an email. Let’s help each other celebrate Simple, Joyful Life!

I’ll be sharing what my missions are this month in my Merry Little Living Project newsletter so be sure to click here to sign up if you haven’t yet! 

Monthly Missions

Filed Under: Merry Little Living, Simple Living Tagged With: noads

How I Doubled My Productivity with Office Hours at Home

February 27th, 2016 By Kaley
This post may contain affiliate links, which means I will make a small commission if you click and make a purchase.

How I Doubled My Productivity with Office Hours at Home

Most days, I love being a blogger. I often call it my dream job.

But working from home has its share of complications, particularly when it comes to balancing work/family life.

It’s very easy to allow work time to creep into family time or vice versa when your family space is the same as your workspace so you have to be careful. I was reading an article that featured some working from home statistics 2020 and I found it so interesting. I often take for granted the fact that I can work from home and be there for my kids if they need me. I mean, it has some fantastic benefits, right?!

Over the last year, I allowed myself to set up my workspace right smack dab in the middle of our living room on the couch. While it’s lovely that this is an option for me, it’s also a really terrible productivity plan. I also use that same space for reading, hanging out with my kids, people-watching through our picture window, even occasionally putting my feet up and taking a nap. So over the course of the year, my work/family/personal time all sort of seemed to flow together without any real structure. At the end of the day, I often couldn’t tell you exactly what I had accomplished that day. I mentioned this to a friend of mine, who recommended I did some research into Tools to Boost Productivity, as this could be the first step to finding the balance between work and life, especially when working at home.

The crazy thing about this situation is that I have a lovely closet office space that my cousin, my husband and I DIY’ed together a few years ago. DIY’ing is in our blood – we’ve got a toolbox brimming with things that are just begging to be used on our next project. We’ve got nuts, bolts, washers, fastening guns; collated screws are ideal for some of the jobs we’ve got planned so it’s good we’ve got plenty of those.

How I Doubled my Productivity with Office Hours at Home

My closet-turned-office space (also my new ukulele – a birthday gift that I fully intend to learn to play this year – not during my office hours though. Of course.).

This fun little nook stayed mostly vacant over the course of the past year. Poor thing.

Last month, one of my monthly missions was to try to set up a simpler schedule for my blogging hours. I knew that my productivity could increase if I had set hours that I worked each day rather than the haphazard daily schedule I’d been keeping.

In order to accomplish this task, I knew something had to change in my work environment. So my first step was to reclaim my closet office in order to have a location where I “report to work” every day. Yes, I may show up in my yoga pants, but let’s just keep that between you and me, shall we?

Then, my next step was to set up my office hours.

Office Hours

I am grateful to say that my 3 year old son still takes a nap each day (knock on all.the.wood.). So it made sense that I should structure my work hours around his nap. He also goes to pre-school three mornings a week, but I decided to keep that time open for running errands, visiting with friends, playing my ukulele or people-watching out my picture window. You just never know what important task a day might bring.

I gave myself pretty limited hours because I wanted to force myself to really focus during those times, I also decided to write down a guideline for each day as to what I hoped to accomplish. I am a bit of a free spirit, so giving myself too much structure usually backfires. However, I’m also a dreamer, so if left to myself, I would spend 9/10 of my week dreaming about the next Big Thing I hoped to accomplish and then the last 1/10 trying to accomplish it. It’s a struggle being my brain sometimes.

So I hung a chalkboard up in my office and I scratched out my office hours for the week and what I intend to do with them.

You guys. I am in LOVE with my new system. After almost 7 years of being a blogger, I feel like I have *finally* found my groove. Is it a fool-proof system? No. Do my hours occasionally still run into each other? Yep.

But my productivity is better than it’s been in years and at the end of a week, I feel a much greater sense of accomplishment than I can remember in a long time. This is not only due to the time I’ve set aside to work, but the time that I’ve set aside for NOT working. I love having an office space too. It’s amazing and as I mentioned before, it’s making me so productive! The only thing I don’t like about my office is how messy it can get. It’s so annoying! One of my friends who owns a business recommended that I check out FilecenterDMS.com to manage my documents so that I don’t have huge piles of paper all over the office! It’s something I’m definitely considering at the minute.

I also feel strongly that by actually physically writing down my office hours and posting them on my wall (and on the internet) for all to see, I’ve created an accountability that’s been missing from my work-by-myself-no-one-knows-but-me office environment. I’ve tried many time though the years to have set times each day that I would work, but never actually posted those hours anywhere. It’s totally out there for the world to see, so I have to stick with it now!

It’s likely that my schedule will need to be tweaked from time to time, but for now I love how my new system works for me!

How about you? Have you ever tried to establish office hours in your home? How does that work for you?

Filed Under: Merry Little Living, Simple Living Tagged With: noads

5 Simple & Delicious Soups Even Your Kids Will Love

February 22nd, 2016 By Heidi
This post may contain affiliate links, which means I will make a small commission if you click and make a purchase.

best kid friendly soups

Delicious and Simple Kid Friendly Soups

It is pouring rain here, cold, foggy….the perfect weather for eating yummy, hot soup! My husband is a lover of all things soup so I’ve been adding some new recipes to my rotation and this winter I’ve declared most Saturdays as “Soup Saturdays”. It’s the perfect day for a low stress meal and soup tastes better the longer it simmers. So throw your ingredients together early in the day and let it go.

Here are my Top 5 Soups that my family has come to love and they are all EASY!

  1. Sherry Tomato Soup: Who doesn’t agree that just the thought of tomato soup and grilled cheese brings back memories of childhood?  This one is super easy and so rich – not your typical tomato soup. Since I have kids who are not big fans of chunky tomatoes I use my immersion blender just before serving to whip it into a smooth texture.  Find the recipe here. 

    Sherried Tomato Soup***

  2. Cheeseburger Soup: This soup is a little more work but makes a TON of soup – leaving you with plenty of leftovers for lunches during the week. I serve this with a simple salad and biscuits! Find the recipe here.Cheeseburger Soup
    ***
  3. Pasta Fagioli: This is a perfect copycat of the always delicious Olive Garden soup. It’s loaded with beans, noodles, veggies and super filling. I substitute ground beef for the sausage since some of my family members are not fans of sausage. This produces a milder flavor but still VERY good and a nice option for kids with sensitive tastebuds. Find the recipe here. 

    pasta fagioli***

  4. Chicken Enchilada Soup: This soup is a super simple crockpot winner! It’s kind of a “dump and go” recipe that can be whipped up in minutes and left to cook all day. Keep these ingredients on hand and you will always have a yummy supper at your fingertips. I throw frozen chicken tenderloins in to make it even easier. Find the recipe here. 

    Chicken Enchilada Soup
    ***

  5. Cauliflower Chowder: This recipe was a surprising winner.  Even my 8 year old daughter loved it and commented on how much the cauliflower tasted like potatoes. It is delicious and packed FULL of veggies. Be sure to follow the serving suggestion and top off your bowl with some shredded cheese and crumbled bacon – delish! Find the recipe here. 

    Cauliflower Soup


So there you have it. A simple list of family friendly soups that will get you through a month of Soup Saturdays!

Filed Under: Merry Little Living, Recipes, Simple Living Tagged With: noads

The #1 Tip That Changed My Laundry System And Gave Me Back My Life!

February 16th, 2016 By Heidi
This post may contain affiliate links, which means I will make a small commission if you click and make a purchase.

laundry image 1

Oh, laundry. It’s not a problem that’s going away any time soon, is it? That’s why I’m happy to invite my friend Heidi to the blog today to share a laundry tip that may just eliminate the “I don’t have any socks!” issue from your family’ s laundry discussion forever. (Now if she could just solve the problem of missing socks, we’d be golden!)

The #1 Tip That Changed My Laundry System And Gave Me Back My Life!

Ok, so that title might be a bit too dramatic, but honestly I really have more time now! And who doesn’t need more time?

I’ve been doing laundry the same way my whole life and you probably have too. I had a hamper for whites/lights and a hamper for darks. When each was full I would do a load of laundry. Then I would take it out of the dryer, into the living room, plop in front of the TV,  fold, put into piles for each member of my family and ask them to put it away. That’s exactly how my mom did laundry too, so of course it made sense for me to believe that was the most efficient method.

My children are 10, 8 and 17 months, and I’ve had my older two helping with laundry for a little while now. I find that school takes a lot out of my kids so during the school year I don’t have too many household jobs for them. They are expected to help out around the house, keep their rooms clean (which really, do they ever stay that way??) and generally assist when asked. The only jobs they are responsible for is emptying the dishwasher and folding laundry with each child taking a week for one of those jobs. But my kids were constantly bickering and I could never keep track of who did which job last. 

There was ALWAYS a response of “but I did the laundry last time…” I really couldn’t take it anymore.

Then one day I stumbled upon this tip on Pinterest. I wasn’t really interested in looking at it because I didn’t think my system was broken but I figured I’d just take a peak…and wouldn’t you know, it really did change how I view and do my laundry!

Here’s what I did:

  • Moved the family hampers out of the hallway & gave everyone a personal hamper in their bedrooms
  • My husband and I share a hamper with the baby.
  • When my older children have a full hamper they are responsible to bring the bag of dirty clothes to the laundry room and ask me to wash their laundry for them
  • I most often wash on cold for economic reasons so it’s no big deal to lump all their clothes together in one load
  • When their laundry load is finished it is their job to sort, fold and put away in their own rooms

Simple. Not rocket science.

No More Excuses

But you know what it did? I no longer hear the following:

“It’s not my job…”

“I did it last time…”

“I don’t want to fold his/her underwear…”

“You didn’t hang my shirts up right…”

“I don’t have underwear…”

“I don’t have jeans…”

“I don’t have socks…”

If my kids don’t have the things they would like to wear then this is all I need to say: “Is your hamper full? Do you need to bring it down?” It puts the responsibility of clean clothing primarily on them and I no longer have to keep apologizing or saying “Just wear those socks again for today and I’ll do laundry tonight”.

Another plus…my husband and I always have plenty of clean clothes now. If your household is like ours, the kids have way more clothing than the adults simply because they are lucky enough to get hand-me-downs. My kids can go more than a week between laundry loads, but I need my favorite jeans washed more often.

Since I’ve switched to this new system, I’m not dealing with bickering, I’m not apologizing, I’m only putting away laundry for 2.5 people, I have more clean clothes, more time and more peace!!

Winner. Woohoo!

The #1 Tip That Changed My Laundry System And Gave Me Back My Life!

75 Laundry Hacks to Save Your Sanity
My 3 Step Simple Laundry System
My $100 LEGO Center Makeover

Filed Under: Merry Little Living, Organization Tagged With: noads

  • « Previous Page
  • 1
  • 2
  • 3
  • 4
  • 5
  • …
  • 7
  • Next Page »

Welcome

About
Contact

My  name is Kaley. Wife, Mama, and Dreamer, I have a passion for saving money, living simply, and helping others find creative ways to live large on a limited budget.

My Favorite Things

Copyright © 2025 Kaley Ehret · Site Design by Sharon Hujik · Log in
Disclaimer | Disclosure Policy | Privacy Statement